Basic tips for Muv-Luv Alternative Faraway Dawn and its sequel, included in Altered Fable and Haruko Maniax respectively.
Gameplay Basics[]
Icon Explanation[]
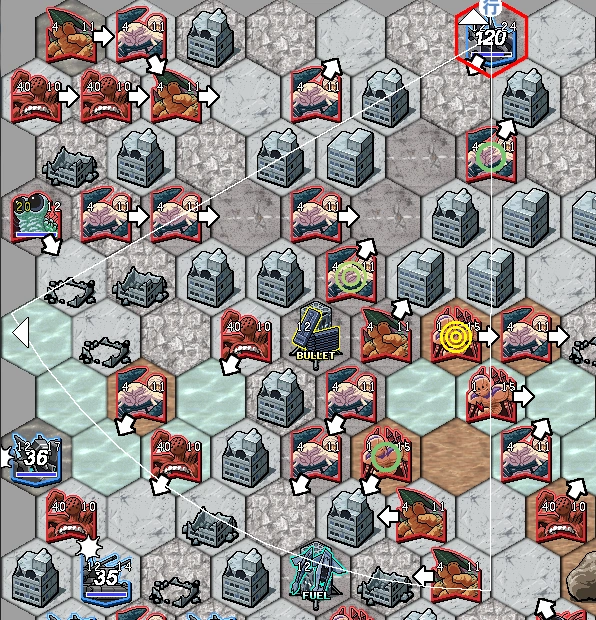
Each icon on the map represents one group of units. Each player group is composed of 12 individual units. These units can be tanks, armored vehicles, or TSFs. As BETA are cheating bastards, they can cram many more units into each group, and deploy many many more groups than the player. The number of units in the BETA groups are determined by the difficulty level you are playing on.
Icon for a Type-94 Shiranui.
The icon represents what type of unit the group is composed of. Unlike the BETA, the player cannot stack or consolidate groups. The small number on the top left denotes how many units are left in a group. The small number on the upper right indicates how many action points the group still has. The large number or characters in the center denote what weapon is currently equipped.
For TSFs, a 36 denotes that the group currently has their 36mm Chaingun equipped; a 120 shows that they're currently equipped with their 120mm cannons. ナイフ (naifu) indicates that the group is equipped with the Type-65 PB Knife, and 長刀 (naginata) denotes that they're equipped with the Type-74 PB Blade. For the Type-90 MBTs, 120 indicates that the tank's main cannon is equipped, and 12.7 indicates that the tank is currently equipped with the nigh-useless 12.7mm machine gun. The Type-87 SPAAGs only have one weapon, the 35mm anti-aircraft gun. The blue bar on each icon, under all the indicators, represents how much ammo (or HP in the case of blades and knives) remains for the group, and the arrow denotes the group facing.
Supply Container Types[]

Delicious Fuel

Your gift to the BETA. Also includes swords and knives.
This should be fairly obvious. You can resupply while around the hex the container is on. Resupplying (if possible) at the end of each stage in Campaign Mode is vital, since ammunition and fuel carry over to the next stage.
Movement[]
There are three types of movement for TSFs: walking/running on the ground, boost jumping, and flight. AP is the only limitation on a unit's movement range. However, AP costs for TSF movement also includes the costs for turning, making long-distance travel on the ground prohibitive.
Tanks and armored vehicles can only travel on the ground, but are capable of performing lateral movement for less AP than TSFs can. This is because the armored vehicles in this game all use the tank chassis, and don't need to face any direction to move towards it. For these units, movement of one hex costs a flat 3 AP, regardless of direction.
Boost Jump[]
TSFs can only boost jump towards directions determined by their facing. There are six types of boost jump, which are unlocked as a unit levels up.
| Level | Jump Name | AP Cost/Distance (in hexes) | |||||
| 2 | 2-4 | 5-6 | 7-8 | 9-10 | 11-12 | ||
| E |
Normal Jump (通常ジャンプ) |
6 |
7 |
8 |
9 |
10 | |
| D |
Jump Attack (ジャンプ攻撃) |
7 |
8 |
9 |
10 |
11 | |
| C |
Back Jump (バックジャンプ) |
8 |
|||||
| A |
Short Jump* (噴射跳躍&反転降下) |
4 | |||||
| AA |
Jump and turn around* (反転倒立ジャンプ) |
8 | |||||
| AA |
Short jump attack* (噴射跳躍攻撃&反転降下) |
4 | |||||
Flight[]
Flight costs 15 AP to activate and costs fuel, but reduces AP cost for turning and movement to trivial amounts. Turning 60 degrees while flying only costs 1 AP, while forward movement of three hexes also costs 1 AP. A TSF unit can move across most maps in a single turn while flying.
It also allows TSFs to avoid any attack from most BETA. However, flying TSFs are vulnerable to attack from Laser-class BETA. Some scenarios feature off-map Laser-class BETA, which prevent flight (but not boost jumping).
Landing (if not forced by Laser-class fire) costs 4 AP.
Units[]
Type-77/F-4J Gekishin[]
A 1st generation TSF, this venerable machine is still widely used, even though her design is nearly 30 years old. In the first part of the game, she is your mainstay TSF in campaign, but in the second part you will have only 3 of them. Very heavily armored, which is a mixed blessing. For low ranked pilots, the extra armor is a lifesaver, giving them the defense boost they desperately need to stay alive when forced into close quarters combat. High ranked pilots, on the other hand, have great evade bonuses and have little need for high armor, and high turn costs with low action points significantly lower their combat capabilities with the F-4J. Still, she's a useful addition to your forces.
Try to level her pilots to A rank as soon as possible, it's fairly easy and will serve you good. Better units will naturally have more experience per mission so you can forget about intentionally leveling them, and it's very likely for a squad of humble Gekishins with good pilots to save a better unit in a pinch. While very high ranked pilots can safely fight anything in CQC, they don't have enough action points to kill their enemy and push forward, and will most likely be pushed back by BETA due to Tank-class.
The 36mm chaingun is a good weapon, reliable against everything short of Heavy Laser-class, Fort-class, and taking on Destroyer-class from the front. The 120mm cannon can kill them, but are far less effective and nearly useless against softer BETA (Tank-class and Laser-class).
Swords are effective close combat weapons, capable of destroying the aforementioned three BETA types; however, it's a bad idea to use them against the latter two soft targets. Usually your best choice when fighting in CQC, as the 120mm has too little ammo to be worth using against anything that's not a Heavy Laser-class.
Knives are your last-resort weapon. They deal very little damage and break very fast, although they are more effective against soft targets then the 120mm and PB Blade. Everything said above applies to all the weapons for all TSF types.
Type-89/F-15J Kagerou[]
A 2nd generation TSF, and she is quite possibly the best 2nd generation TSF in the whole world. She's far from being as tough as Gekishin, and her mobility, while better then the Gekishin's, is not that great. But she turns for less action points and has more of them.
She's good, but not great. Again, level her pilots to A rank if you have BETA to spare, and they will do their job, and do it damn well. High ranked pilots can safely lock BETA in CQC and stop their advance, giving you the time you need to flank enemies, re-supply, or make a better formation.
Type-94 Shiranui[]
The first 3rd generation TSF, the Type-94 is as beautiful as she is deadly... As well as having a weird nickname because of the "bunny ears" on her head unit. Your mainstay TSF in the second part of the game. Great mobility, a lot of action points, and turns for less action points then the Kagerou.
She has everything you would expect from a 3rd generation TSF. You can forget about intentionally leveling their pilots, they will naturally level very fast because of their high amount of action points. High-ranked pilots can easily lock BETA in CQC and have enough action points to push forward through enemy ranks.
Type-97 Fubuki[]
Despite it's poor performance, the Type-97 is a 3rd generation TSF as well; its primary purpose is as a training TSF. Its performance is a combination of moderate mobility, low action points, low turn cost, and low fuel. You will get them in a complete set with trainees instead of actual pilots, so don't be discouraged by their poor performance, as it's all because of the pilots.
They are the units you should level as soon as possible, as they can't do anything much at their current levels and will become dead weight otherwise. There are units that you can chose to level or not to level to complete the game. You don't have that choice with the Fubuki, you will need them to be high-ranked to complete it.
Type-00 Takemikazuchi[]
A 3rd generation TSF made specifically for the Imperial Royal Guard, and the highest-perfoming Japanese TSF. With an exceptionally high amount of action points and mobility, combined with an extremely low turn cost, she is a work of art. There is nothing capable of stopping high-ranked pilots using her, not even Laser-class BETA; she will smite and cleave, cleave and smite all the way to them with ease.
The Type-00 is available in Free Play mode only; the first unit unlocks after you have completed the game on Normal Mode, and the second unlocks after completion of Hell Mode.
Main Battle Tank[]
You will have a lot of them in both parts of the game; it is to TSFs what bread is to butter. Despite looking bad overall, its 120mm cannon has a huge range and deals huge damage; shelling down Heavy Laser-class is a trivial task with it. Its 12.7mm machine gun is good at killing hordes of Tank-class and Laser-class; however, the MBT is extremely vulnerable in CQC. High-ranked MBTs are the key to victory in many situations, and ignoring them is unwise; level them up as soon as possible, to the highest level possible.
Self-Propelled Anti-Aircraft Gun[]
Cheerfully nicknamed "Guntank"; you'll have a lot of them too. Their main advantage is their low height and the huge range of their 35mm autocannons. Overall, a very useful unit, and if high enough ranked, very deadly.
Use its weapon range to the limit; high-ranked SPAAGs can easily keep a passage 4 hexes wide and 6 hexes long clean, killing all but Fort-class and Destroyer-class easily. The 35mm autocannons' 900-count ammo is very little, and you will likely run out of ammo in a single mission. Resupply whenever possible.
| Unit | Gekishin | Kagerou | Shiranui | Fubuki | Takemi | Type-90 MBT | Type-87 SPAAG |
|---|---|---|---|---|---|---|---|
| Size | Medium | Medium | Medium | Medium | Medium | Small | Small |
| Height* | 18m | 18m | 18m | 18m | 18m | 3m | 4m |
| Action points | 16 | 20 | 24 | 12 | 28 | 15 | 12 |
| HP | 140 | 136 | 136 | 90 | 144 | 100 | 100 |
| Fuel | 170 | 200 | 230 | 100 | 250 | - | - |
| Movement cost | 2 | 2 | 2 | 2 | 2 | 2 | 2 |
| Turn cost | 4 | 3 | 2 | 2 | 1 | 3 | 2 |
| Backstep cost | 8 | 7 | 6 | 6 | 5 | - | - |
| Armor | |||||||
| Front | 160 | 96 | 96 | 82 | 104 | 86 | 86 |
| Diagonally Forward | 150 | 88 | 88 | 72 | 96 | 80 | 80 |
| Diagonally Backward | 120 | 80 | 80 | 56 | 88 | 77 | 77 |
| Backward | 95 | 72 | 72 | 56 | 72 | 74 | 74 |
| Evasion rate | |||||||
| Front | 70 | 80 | 85 | 80 | 95 | 5 | 5 |
| Diagonally Forward | 60 | 70 | 75 | 70 | 85 | 5 | 5 |
| Diagonally Backward | 20 | 40 | 40 | 38 | 45 | 5 | 5 |
| Backward | 10 | 30 | 30 | 28 | 35 | 5 | 5 |
| Anti-laser coating | 100 | 100 | 100 | 100 | 100 | 150 | 150 |
- Note that it is not actual height, but the number the game uses for calculation. Actual TSF, MBT, and SPAAG heights can be looked up elsewhere.
Attacking[]
Group Facing and Firing Arc[]
Group facing determines firing/attack arc and effectiveness, as well as the direction of certain jumps. Weapons have different ranges. The 36mm chaingun has four hexes of range, while the 120mm cannon can reach targets eight hexes away, as shown above. Melee weapons such as knives and swords can only damage enemies adjacent to the unit. Meanwhile, the Type-87's 35mm anti-aircraft gun has seven hexes of range, while a Type-90 tank's 120mm main gun can hit targets 13 hexes away. The tank's 12.7mm machine gun is effective up to four hexes away.
Attack Effectiveness[]
An attack's potential damage is indicated by the symbol over the BETA group. No symbol means the attack will not hit, a triangle means the attack would have very low effectiveness, and a circle shows that the attack would be effective against its target. The more circles there are, the clearer shot you have, and thus can deal more damage with fewer shots/swings.
Targets that can be shot are determined by unit heights, so buildings and debris can provide cover to both you and the BETA. BETA will actively destroy cover. While playing it safe and hiding behind covers on lower levels of difficulty is a fair choice of strategy, on higher levels most BETA will one-shot any cover, so you're left with very few options. One thing to note is that TSFs are taller than tanks and APCs, so they will obstruct shots from the latter. In a worst-case scenario, they can be used to shield the latter.


Target menu for 36mm chain gun.
Hovering the mouse cursor above a valid target will reveal a radial menu indicating the number of attacks that can be made on the enemy. The numbers directly correspond to the amount of ammunition that would be fired (for firearms) or the number of swings/uses (for melee weapons). The option at the center of the menu is the command to attack the enemy until it is destroyed, or the unit runs out of AP. This is the ideal choice if the player seeks to conserve ammunition against weakened targets: only the necessary amount of shots will be fired, reducing the potential for wastage. When spending a lot of AP on one attack(i.e. 4 melee attacks, 250 shots fired) you will have bonus accuracy and damage, up to 8 attacks.
| Number of attacks | 1 | 2 | 3 | 4 | 5 | 6 | 7 | 8+ |
|---|---|---|---|---|---|---|---|---|
| Bonus attack power(%) | 0 | 1 | 2 | 4 | 10 | 20 | 32 | 40 |
| Bonus accuracy | 0 | 2 | 4 | 7 | 12 | 20 | 30 | 40 |
Overall Weapon Info[]
| Ranged weapon | Ammo (per magazine) | Spage magazines | Range | Attack power | AP cost | Ammo cost | Accuracy bonus |
|---|---|---|---|---|---|---|---|
| 36mm Chaingun (TSF) | 2000 | 4 | 4 | 100 | 2 | 50 | 0 |
| 120mm cannon (TSF) | 6 | 2 | 8 | 264 | 2 | 1 | 0 |
| 120mm cannon (MBT) | 40 | 0 | 12 | 300 | 3 | 1 | -20 |
| 12,7mm machine gun(MBT) | 2000 | 0 | 4 | 77 | 2 | 50 | -20 |
| 35mm cannon (SPAAG) | 960 | 0 | 7 | 110 | 2 | 40 | -20 |
| Meele weapon | HP | Spare weapons | Range | Attack Power** | AP cost | HP cost | Accuracy bonus |
| Type-74 PB Sword | 100 | 1 | 1 | 75 | 3 | 1 | 0 |
| Type-65 PB Knife | 100 | 1 | 1 | 35 | 2 | 1 | 0 |
- Despite low numbers, swords and knives are effective against heavily-armored targets. For ease of understanding, calculate swords as ignoring all armor, and knives as ignoring anything up to Fort-class armor.
Menu Explanations[]
Unit Status Block[]
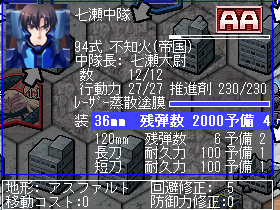
This is your main character in both Faraway Dawn 1 and 2. If he dies, you lose.
The "AA" space on the top right denotes the group level, with the bar underneath it showing the experience points earned. The 12/12 indicates, in order, the current and total possible units in the group. Likewise, the 27/27 denotes current and max Action Points respectively.
Your AP will fully recover at the start of all of your turn, and differs between TSFs and levels. The 230/230 determines how much fuel is left for Boost Jumping and/or flying.
The blue bar denotes Anti-Laser Coating. The numbers in the left hand column (2000) indicate how much ammo/uses is left in a particular weapon, while the right hand column (4) indicates how many spare magazines you have left, and thus how many times you can reload. As your group unit increases, the group gains special bonuses and new Boost Jump types.
The white-bordered box below shows information about the hex the unit is currently standing on. The left-hand column shows the terrain type and its additional movement cost. The right-hand column indicates the terrain's bonus to evasion and defense. Terrain information for unoccupied hexes can also be seen by hovering the mouse cursor over the desired area. If a hex has an obstruction, then only the type and height of the obstruction will be displayed.
Terrain effects
|
Terrain |
Bonus |
Extra jump cost* | Extra flight cost* | ||||
|---|---|---|---|---|---|---|---|
| Movement cost | Evaision | Defence | Action Points | Fuel | Action points | Fuel | |
| Soil | 0 | -2 | 0 | 0 | 0 | 0 | 0 |
| Concrete | 0 | +5 | 0 | 0 | 0 | 0 | 0 |
| Sand | 0 | -5 | 0 | 0 | 0 | 0 | 0 |
| Grass | +1 | +5 | 0 | 0 | 0 | 0 | 0 |
| Mud | +2 | -5 | 0 | +4 | +6 | +4 | +6 |
| Asphalt | 0 | +5 | 0 | 0 | 0 | 0 | 0 |
| Sandbanks | +2 | -10 | +2 | +4 | +6 | +4 | +6 |
| Rubble | +2 | -5 | +1 | 0 | 0 | +2 | +3 |
| Woods | +2 | -5 | +1 | 0 | 0 | +2 | +3 |
| Water | +3 | 0 | 0 | 0 | 0 | 0 | 0 |
- When initiating jump/flight
You can't shoot targets in water. You can't enter water hexes with your units.
| Obstacles | Mountain (large) | Mountain (small) | Forest | Building | Slightly damaged building | Damaged building | Heavily damaged building |
|---|---|---|---|---|---|---|---|
| Height | 36m | 5m | 10m | 24m | 18m | 12m | 6m |
| Hit Points | 3200 |
Unit Menu[]
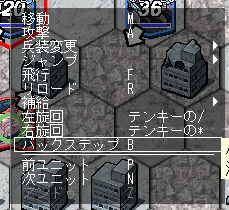

Unit Menu (Faraway Dawn 2)
Right clicking on of your units will bring up this menu, or a variant thereof. The first two menu items are Move and Attack respectively, but there are much better done simply left clicking on the unit and selecting where you want to move and want to what to attack.
The next menu item is very important, as it allows you to change what weapon that group is currently equipped with. The numbers displayed in the drop down list are the respective AP cost to do so.
The next menu item is Jump. The first is the standard boost jump and how many AP it costs to do is displayed by the square you are jumping to. The next is Jump & Attack. Space Movement cost is displayed on a given space, and enemies that can be attacked during your Jump will be highlighted after you select a space to Jump to. The next is Back Jump, your unit jumps backward, followed by Boost Hop, where your TSF moves forward at the cost of 4 AP and some fuel. Generally, your unit has the least chance to be scorched by a Laser-class when performing this maneuver. Next is is Jump and Turn Around, which very useful against the Destroyer-class. And the last one is Boost Hop & Attack.
The next menu item is Flight. You can move for very little AP, can't be attacked by non-Lux, can move over any BETA units or obstacles in your way, but it burns through huge amount of fuel and the Laser-class will instantly rape you to death if they are present and are capable of firing.
The next menu item is Turn 60 Degrees Counter Clockwise. The next is Turn 60 degrees Clockwise. Both take 4 AP. And the last option is back step one space at the cost of 6 AP. There is no such option in menu is first game, but by pressing B button you will have the same effect.
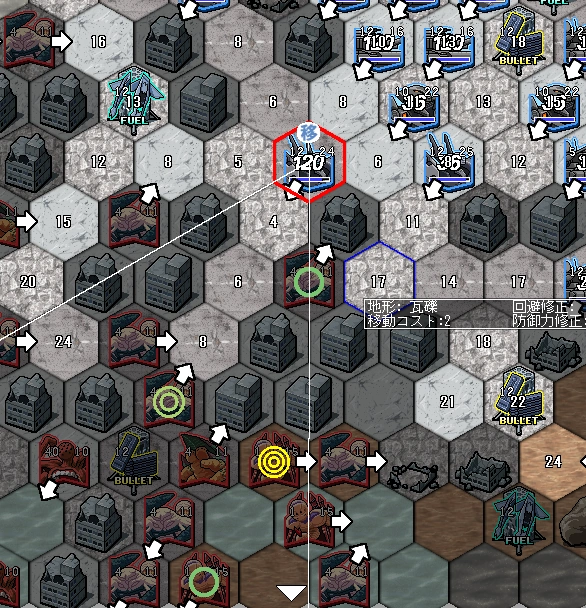
The above is a picture of what is displayed when you left-click on one of your units. The numbers displayed are how much AP it will cost to move to that space without turning. BETA with shapes over them are groups that can be attacked.
Unit Level[]
Leveling pilots is extremely important. The higher the level, the better a particular unit will fare, ranging from dealing more damage, having better accuracy, having more action points, and in case of TSF pilots, turning for less action points, to having better chance at surviving both Laser-class attacks and close combat with Grappler-class/Destroyer-class BETA. The lowest rank is F, with SSS being the highest achievable rank. A unit's potential, like the experience it costs for the pilot to level up, grows exponentially. Different BETA strains give different amount of EXP points for killing them. Tank-class yield the least, followed by Laser-class, Grappler-class and Destroyer-class, then Heavy Laser-class. The biggest amount of EXP points, naturally, come from the Fort-class.
Level bonuses.
| Unit rank | F | E | D | C | B | A | AA | S | SS | SSS |
|---|---|---|---|---|---|---|---|---|---|---|
| EXP needed* | 0 | 10 | 20 | 40 | 80 | 160 | 320 | 640 | 1280 | 2560 |
| Base chance to miss(Rapid fire weapon) | 80 | 60 | 40 | 30 | 20 | 10 | 7 | 5 | 4 | 3 |
| Base chance to miss(Other weapons) | 3 | 2 | 1 | 0 | 0 | 0 | 0 | 0 | 0 | 0 |
| Evasion bonus(TSF) | -20 | -10 | -10 | 0 | +14 | +32 | +60 | +100 | +150 | +180 |
| Evasion bonus(Tanks) | -20 | -20 | -15 | -10 | -5 | 0 | +5 | +10 | +15 | +20 |
| Accuracy bonus | -20 | -10 | -5 | 0 | +7 | +16 | +36 | +54 | +80 | +95 |
| Attack bonus (Rapid fire weapons) | 0 | 0 | 0 | 0 | 5% | 10% | 20% | 50% | 70% | 81% |
| Attack bonus (Other weapons) | -1% | -0,5% | 0 | 0 | 10% | 20% | 40% | 60% | 80% | 100% |
| Bonus action points | ||||||||||
| Takemikazuchi | 0 | 0 | 0 | +1 | +2 | +3 | +4 | +5 | +6 | +8 |
| Shiranui & Fubuki | 0 | 0 | 0 | +1 | +1 | +2 | +3 | +4 | +5 | +6 |
| All others | 0 | 0 | 0 | +1 | +1 | +2 | +2 | +3 | +3 | +4 |
- EXP needed to level up is cumulative, so to level from F to C you will need 70 EXP points (0 for F +10 for E + 20 for D + 40 for C), not just 40 EXP points.
Combat With the BETA[]
Approach most strains of BETA by exploiting their behavioral weakness as presented in the game, and use the appropriate weapon(s) to defeat them.
Laser-class/Heavy Laser-class[]
Both BETA strains won't fire through other BETA, and can only fire so many times per phase. (Heavy)Laser-class firing range can also be seen by clicking on one, and is denoted by the arc. Flanking them is sort of possible. The blue bar beneath them shows how many times they can fire, and how soon they can fire again. For the Laser-class, this is 1 shot per group, per phase. For the Heavy Laser-class, this is 1 shot per group, per turn, with one Phase being Player Phase > BETA Phase > Player Phase etc. One turn is One Player Phase > One BETA Phase.
Anti-Laser Coating, like units, cannot be recovered from the third stage on. It's absolutely vital to the survival of your groups as you can't accurately predict where a Laser-class can fire upon; this is the only leeway you have before your groups get nearly annihilated from just one attack. Thankfully, this only applies to Campaign Mode.
The longer your unit is in firing range, and the closer it to the (Heavy)Laser-class, the more Anti-Laser Coating the shot will burn. The RNG determines how many units you will lose if you stay too long in its firing range, so use save/load for best results.
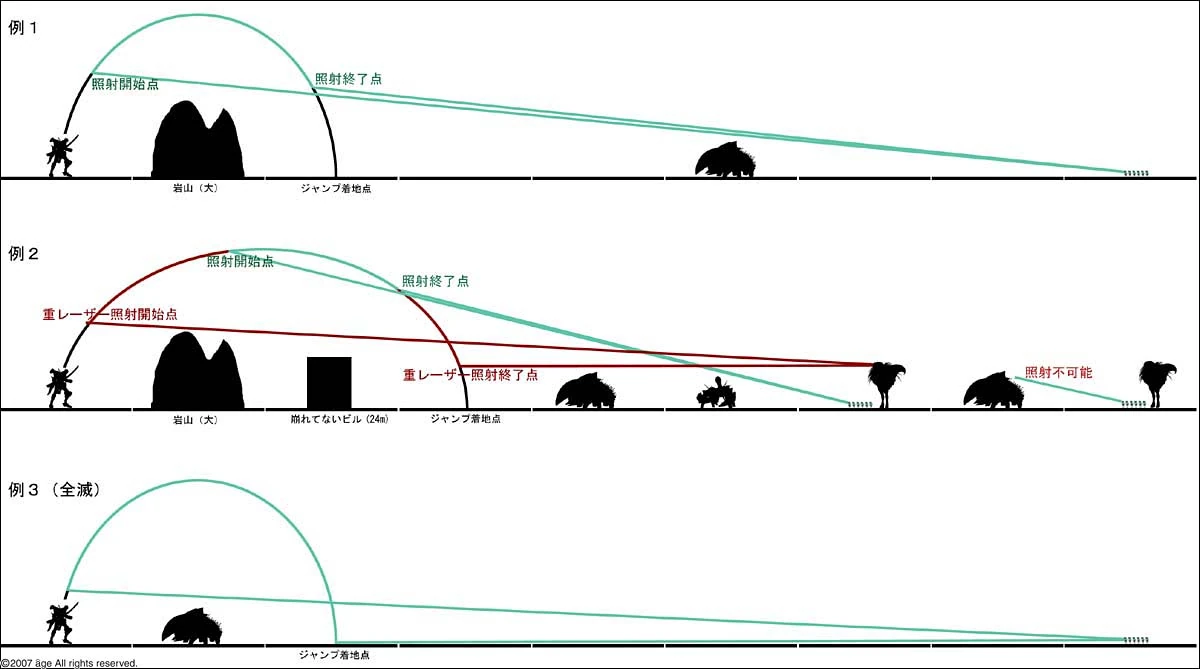

Top to bottom: the conditions whereby a Lux/Magnus Lux achieves firing conditions. The semicircle represents Boost Jump trajectory.
One of the most important things is to learn how and when you can boost jump while Lux are present. This can't really be explained and can only really be figured out through trial and error, but some tips are look at where a Laser-class' firing arc is. If there's anything one space ahead of it that's taller than it, you can almost freely jump within its firing arc. Of course, you can also jump so long as you're not in a firing arc. However, Heavy Laser-class are much taller than most other BETA, debris, and buildings, and thus are harder to avoid. Refer to the image to the right.
36mm chainguns, 35mm autocannons, and 12.7 machine gun are the most effective against Lux. However, the Magnus Lux are much heavier armored, with 120mm cannons and Type-74 swords the only things capable of bringing them down. High-ranked units (AA-ranked and above) can kill Magnus Lux with 35mm autocannons and 36mm chainguns, due to damage bonus they gain with their rank.
Remember that it takes AP to turn and attack for BETA too. Both laser strains will usually turn in a TSF's direction when it boost jumps, even when there is not enough AP left for it to fire.
Terrain penalties(or Magnus Lux destroying cover, it really loves to destroy cover) also help to greatly reduce the danger that Lux/Magnus Lux present. They will also attack TSFs entering their arc of fire on the player's phase, but not SPAAGs/MBTs, so you can safely move those into their arc of fire. On BETA phase, they will fire at them, so keep that in mind.
Destroyer-class[]
Destroyer-class BETA obviously have a very low movement cost and a very high turning cost. Its attack is a very strong ramming charge, and it does not need to move to use it. The best tactic is to sidestep their charge, as they can't really turn and attack after moving. They are the first BETA strain which attacks can be easily dodged by decently-ranked pilots in a TSF, so having a few TSFs hold the line while other units engage more dangerous targets is a tried-and-true tactic. Terrain penalties may make it especially easy to avoid direct contact with them.
They are easiest to defeat with 120mm cannons and Type-74 swords from the front. High-level units can kill Destroyers with Type-65 knives, but with a high AP cost. However, Destroyer-class are very vulnerable from the rear. If attacked from the back, a TSFs' 36mm guns, the Type-87's 35mm autocannon, and even Type-90's 12.7mm machine gun can easily take down Destroyers. As such, flanking or boost jump maneuvers (as long as there are no Laser-class) can prove extremely effective against them. On higher level of difficulty that's the only way to defeat them without concentrating Type-90 Battle Tank 120mm cannon fire or spending a lot of action points constantly reloading TSF's 120mm cannons.
Those Little Red Fuckers (Tank-class)[]
The Tank-class are the most numerous BETA on the battlefield, their number are a few magnitudes greater than the number of Destroyer-class/Grappler-class you will face. They have average turn and move AP costs.
It attacks by grabbing onto your units, literally eating them where they stand; however, they can't start their attack on the turn that they grabbed onto a unit. It takes 5 AP for them to grab onto your unit, so they can be easily avoided if you have room to move away. More often than not, you will never have a place to move away from them, mainly due to the unit in question holding the BETA advance in close quarter combat.
You can't dodge their grabbing attack, you can't dodge their eating attack, and you can't dodge, move, or turn when grabbed onto. The only way to free your unit is to kill all the Tank-class. Because of this, they are extremely dangerous if not dealt with immediately.
Technically, all weapon types will work on them. The 36mm chaingun, 35mm autocannons, and 12.7mm machineguns are the ideal weapons to use. Don't bother with 120mm cannons and swords/knives; they can only kill a few Tanks per round/swing, so it's much more effecient to kill them with rapid fire weapons.
Once the Tank-class have grabbed onto your units, you can't attack them without damaging your own units. This applies only to low-ranked units; an AA+ ranked unit can easily mow them down without damaging your own units with the 36mm chaingun by using perfect aim (three yellow circles) and attacking only with 50 rounds. Anything above will damage your units.
Grappler-Class[]
They have fairly average movement, a low turn cost, and a melee attack. The second BETA stain with attacks that can be dodged by a decently-ranked TSF unit. The "easiest" BETA to kill; however, don't underestimate them, as in large packs they can move fast and destroy your MBTs, SPAAGs, and even TSFs if left unchecked.
36mm chainguns, 35mm autcannons, 120mm cannons, and Type-74 swords are the most effective. The only thing that can't damage them is the MBT's 12.7mm machinegun. Use whatever suits your tastes more.
Fort-class[]
As the largest BETA , it can't be scratched by anything short of 120mm cannons and swords. They have a low movement cost, a high turn cost, and an extremely powerful attack along with a high amount of action points. In small groups(of 1-5) they prove little challenge, but they are extremely, and I really mean it, extremely dangerous, and very hard to kill in large packs. The third BETA strain with attacks that can be dodged. Thankfully, you will not face a lot of them throughout.
Overall BETA unit info[]
| BETA Class | Tank | Lux** | Grappler | Destroyer | Magnus Lux*** | Fort |
|---|---|---|---|---|---|---|
| Size | Small | Small | Medium | Medium | Large | Huge |
| Height | 3m | 3m | 12m | 16m | 21m | 66m |
| Action Points | 10 | 12 | 11 | 11 | 12 | 15 |
| Attack Power | 40 | 140 | 256 | 320 | 9600 | 1600 |
| Hit Points | 120 | 80 | 320 | 400 | 400 | 1800 |
| Armor | ||||||
| Front | 56 | 48 | 95 | 180 | 110 | 180 |
|
Diagonally forward |
56 | 48 | 90 | 165 | 130 | 175 |
| Diagonally backwards | 48 | 40 | 85 | 64 | 125 | 170 |
| Back | 40 | 32 | 80 | 56 | 120 | 165 |
| Evasion rate (%) | ||||||
| Front | 10 | 20 | 15 | 5 | 5 | 5 |
| Diagonally forward | 10 | 15 | 10 | 5 | 5 | 5 |
| Diagonally backwards | 5 | 10 | 5 | 5 | 5 | 5 |
| Back | 5 | 10 | 5 | 5 | 5 | 5 |
| Action point cost | ||||||
| Move | 2 | 3 | 2 | 1 | 3 | 2 |
| Turn | 2 | 4 | 1 | 8 | 5 | 5 |
| Attack | 5 | 3 | 3 | 3 | 6 | 3 |
| EXP | 1 | 4 | 10 | 10 | 30 | 50 |
- Can only attack once per phase
- Can only attack once per game turn
Be noted that terrain effects may change those numbers.
General Tips[]
- Start on Very Easy difficulty rather than anything else. This will allow you to get the basics down, while still finding the game challenging. Don't let the Very Easy setting fool you, though, it's still very possible to lose.
- SAVE OFTEN. At the beginning, middle, and the end of each of your phases at the very least, as well as before any risky moves are made.
- PRESSING Z WILL ALLOW YOU TO UNDO ANY MOVES ASIDE FROM ATTACKING, OR ANY MOVES THAT RESULTED IN YOU BEING ATTACKED, SUCH AS JUMPING/FLYING WHEN LASER-CLASS ARE PRESENT.
- As the number of units in a group declines, its effectiveness in battle is greatly decreased. If a high ranking/level group loses more than than a third of its initial units, you should probably reload the level.
- Turning is absolutely essential to positioning and moving efficiently.
- Be careful as smaller strains such as Laser-class and those Little Red Fuckers can merge into groups with large BETA strains. The larger strains must be killed before you can damage the group of the smaller strain. With the Laser-class such an action it is actually beneficial to the player, as they can't zap anything when merged.
- On maps with Fuel and Ammo Containers, make sure you reload your units at least once, and if you can, make sure to leave one relatively harmless enemy left, and have all of your units reload and all of your TSFs refuel, before clearing the stage. Also, using a container will completely fill up the ammo in a gun. However, resupplying and refueling tend to take most if not all of your AP, potentially leaving you with a negative number. The BETA can and will destroy the supply containers, so be careful of that. Again, this only applies to Campaign Mode.
- The game uses RNG, not flat %, so it's possible to save/load repeatedly for much more beneficial results with nearly any action.
- Boost Hop usually(but not always) results in less damage from Laser-class then the usual Boost Jump, and costs only 4 AP. With some maneuvering, you can sap AP from numerous Laser-class, with very little damage to the unit performing this maneuver, resulting in you freeing the map from laser interception fire. This video http://nicoviewer.net/sm13938184 shows perfect execution of said tactic.
- Given the choice, BETA will always attack TSF units over MBT/SPAAG units. For example, if there is a Grappler-class next to your Type-94 Shiranui and MBT, the Grappler-class will always attack the Shiranui and will completely ignore the MBT.
- Also, BETA will always try to move to and attack the nearest player unit unless their objective is something else(4th FA1 mission, for example). Sending one unit as bait is a valid choice.
- Try not to rely on the TSF's 120mm cannon on anything above Hard Mode. As the number of BETA increases, its effectiveness is reduced due to very limited ammo. Use swords when you fight in close quarters, and save 120mm for the Heavy Laser-class.
- Don't disregard Main Battle Tanks and SPAAGs, as they are very effective if their rank is high enough(A+). One S-ranked SPAAG unit can easily mow down at least 150 Grappler-class, and one S-ranked MBT can kill up to 50 Destroyer-class(targeting their front armor) per one player phase.
- While Very Hard and onward can scare you with the sheer amount of BETA there is, don't be afraid. While the first few missions would be challenging at best, you can rank up your units much faster then on Very Easy, and from A-rank and onwards, the effectiveness of any unit grows exponentially.
- TSF units of sufficient rank(generally A+) can hold the line surprisingly well. You can hold it for as much as you want with little to no losses even, unless your mission objective is to win in under a fixed number of turns. While TSF units hold the tide at bay, the Laser-class will move closer to your units and merge with the BETA horde your units have stalemated, making it extremely easy to dispatch them with well timed Boost Jump&Turn 180 maneuver or flanking SPAAGs and MBTs.
- Little Red Fuckers will be you main problem when executing the above strategy, as you can't dodge with Tank-class on your unit, making it extremely easy for said unit to be wrecked by the Destroyer- and Grappler-class. (Heavy) Laser-class BETA will not fire upon the unit with the Red Fuckers on them though, so sometimes they can "save" your unit in a pinch. When destroying Tank-class BETA that have already latched onto one of your units, the aforementioned method of combining perfect aim with volleys of fifty 36mm rounds is, by far, the safest way of dispatching these pests, but use Save\Reload if you find yourself in a tight spot; sometimes, high-ranked units can get away with using 200 rounds in a single attack without damaging your allies by benefiting from the inherent rank bonuses and, therefore, killing more enemies, which can make a huge difference when engaging in CQC.
- Don't forget about terrain bonuses. Terrain that applies penalties to movement also applies penalties to turn, making the turning cost for Gekishin a whooping 6 AP. This works both ways; BETA suffer from the same penalties too, as the Destroyer-class in the same terrain will have a turning cost of 10 AP. Using terrain to your advantage will make the game much more easier.
- Dodging consumes fuel. Every time your units are attacked during CQC, they will need small amounts of fuel to actually prevent being damaged, no matter how high-ranked they are. Considering that a single unit can be attacked multiple times during a single turn, their reserves might be drained very quickly, which is why resupplying must be done regularly, especially on higher difficulties.
- During stages in which no Laser- or Heavy Laser-class BETA are present, such as the first and third ones of Faraway Dawn 1, it is usually a good idea to abuse your ability to fly in order to level up low-ranked groups. Experienced units will level up normally due to their usefulness during regular battles, but the same can't be said for units that can't hold their ground in CQC.